基于Unity URP实现SSGI
基于Unity URP实现SSGI
在完成了SSR之后,趁热打铁,紧接着实现SSGI相关的内容。对于这部分内容,我是利用AI将我自己的想法一步步实现,并总结成此文。
在写这篇文章之前,我用AI工具把代码实现,看了效果感觉差不多的时候。我已经用AI写了两篇博客,但AI写的文章,没有人味儿,仍然是晦涩的文字,所以我还是决定自己重新把这部分内容梳理一遍。
关于SSGI的一般概述
在介绍SSGI之前,还是回顾一下GI研究的对象。我们都知道三维物体的光照,分为直接光照和间接光照。
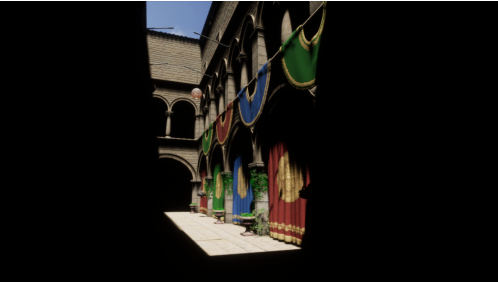
直接光照部分就是物体表面直接受光照射时反射的能量,这部分内容只需要考虑着色点的可见性(是否被遮挡),着色点受光照射时反射进入人眼睛的能量(颜色强度),这部分能量是直接来自光源的,如下图所示:
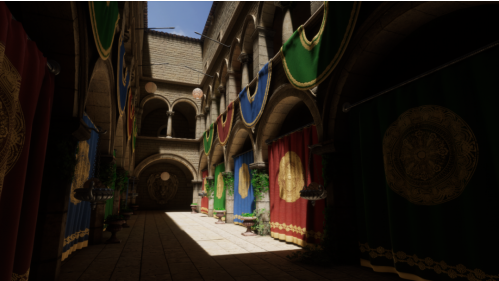
间接光照就是除了直接光照之外,接收到的来自四面八方的光,它可能来自天空,也可能来自其他物体表面反射的光。如下图就是间接光照加直接光照的结果,看起来很接近真实情况。
在实现SSGI方法之前,最好先掌握经典的 Path Tracing方法。推荐阅读一周光追三部曲。跟着书中的内容,实现一个 Path Tracing管线,并把其中的概念理解清楚之后,这样再去理解其他GI算法时,心里有谱。我个人一边阅读一边翻译,总结在了我的博客里,翻译有不准确的地方,去读原文。
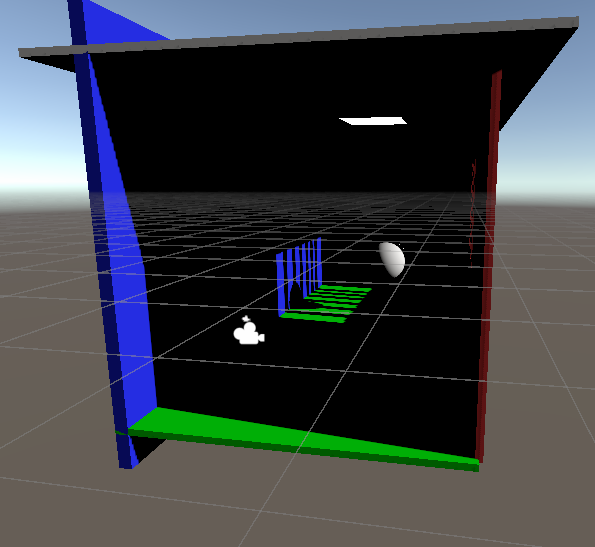
关于SSGI,全称是 Screen Space Global Illumination。即在屏幕空间中,计算间接光照的方法。为了实现该方法,我构造了一个简单的直接光照场景,从Scene视图可以看到相机的摆放位置,内部的照明情况和几何分布。
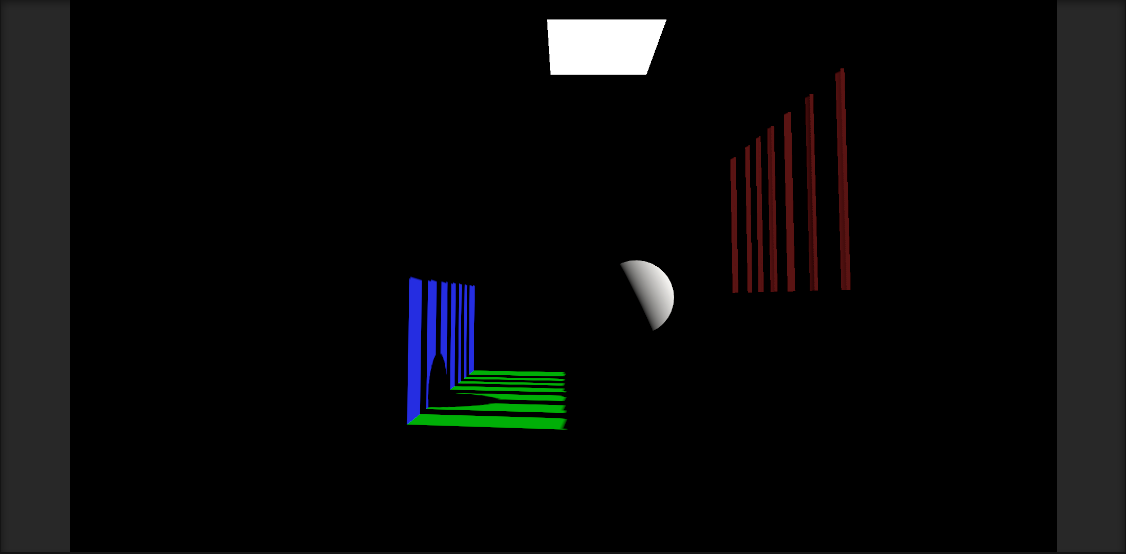
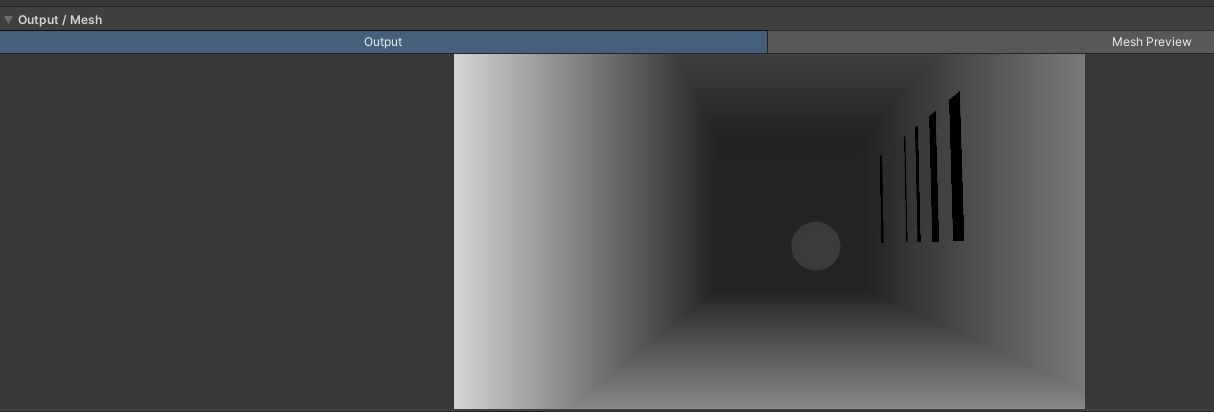
该场景的第一视角渲染结果和深度图如下,我们的目标就是基于这两个输入,计算黑色部分的受光情况。
SSGI基础版的实现流程
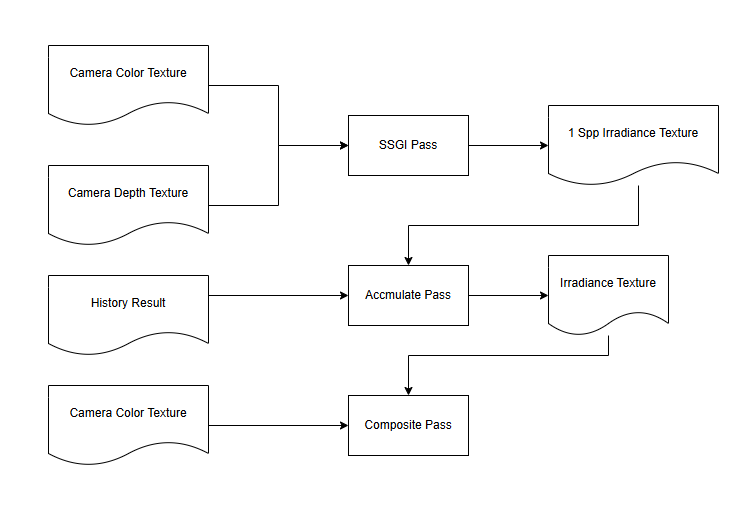
SSGI的大致流程可以总结成下图,其中 Camera Color Texture被用了两次。SSGI Pass只输出一次弹射的结果,然后与历史帧进行合并,最后与直接光照结果(Camera Color Texture)进行混合。当相机或参数有变化时,则清空历史帧数据,重新进行累加。如果需要,还可以在Composite Pass之前插入一个降噪的Pass,例如高斯模糊。该流程的结果,就是蒙特卡洛积分的结果。
SSGI Pass的实现
SSGI Pass的实现前半部分与 SSR的实现一致,很多优化都可以沿用,唯一的区别就是反射光线的计算和irradiance的计算。

float4 FragSSGI(Varyings input) : SV_Target
{
    float2 uv = input.texcoord;


    float rawDepth = SampleSceneDepth(uv);
#if UNITY_REVERSED_Z
    if (rawDepth <= 0.000001) return float4(0, 0, 0, -1.0);
#else
    if (rawDepth >= 0.999999) return float4(0, 0, 0, -1.0);
#endif

    float3 viewPos = ComputeViewSpacePosition(uv, rawDepth);
    float3 normal = GetNormalFromPosition(viewPos);
    if (dot(normal, -viewPos) <= 0.0) normal = -normal;
    float3 irradiance = 0.0;
    int rayCount = clamp(_SSGIRayCount, 1, 128);
    [loop]
    for (int i = 0; i < rayCount; i++)
    {
        float3 rayDir = BuildHemisphereDirection(normal, input.positionCS.xy, i);
        float3 rayStartVS = viewPos + normal * _SSGIOriginBias;
        float3 rayEndVS = rayStartVS + rayDir * _SSGIMaxDistance;
        #if defined(_SSGI_HIZ_ON)
        ScreenSpaceRayHit hit = MarchScreenSpaceRayHiZ(rayStartVS, rayEndVS, _SSGIMaxSteps, _SSGIThickness);
        #else
        // ScreenSpaceRayHit hit = MarchScreenSpaceRayDDA(rayStartVS, rayEndVS, _SSGIMaxSteps, _SSGIThickness);
        ScreenSpaceRayHit hit = MarchScreenSpaceRayBinary(rayStartVS, rayEndVS, _SSGIMaxSteps, _SSGIThickness, SCREEN_SPACE_RAY_BINARY_STEPS);
        #endif
        if (hit.hit)
        {
            float3 hitRadiance = SAMPLE_TEXTURE2D_X(_SSGIRadianceTexture, sampler_LinearClamp, hit.hitUV).rgb;
            irradiance += hitRadiance;
        }
    }
    float3 outgoingRadiance = irradiance/rayCount;
    return float4(outgoingRadiance * _SSGIIntensity, min(viewPos.z, 65500.0));
}
这里我让AI参考了[1]中介绍的半球余弦光线的计算方法,但看结果还是有点出入,_SSGISampleOffset当前累积的帧数统计。
float2 HashRandom(float2 pixelPosition)
{
    float3 p3 = frac(float3(pixelPosition.xyx) * float3(0.1031, 0.1030, 0.0973));
    p3 += dot(p3, p3.yzx + 33.33);
    return frac((p3.xx + p3.yz) * p3.zy);
}

float3 BuildHemisphereDirection(float3 normal, float2 pixelPosition, int rayIndex)
{
    uint sampleIndex = ((uint)clamp(_SSGISampleOffset, 0, 65535) + (uint)rayIndex) & 0xFFFFu;
    uint2 phase24 = (uint2(sampleIndex, sampleIndex) * SSGI_R2_STEP24) & uint2(0x00FFFFFFu, 0x00FFFFFFu);
    float2 temporalSample = float2(phase24) * SSGI_R2_SCALE24;
    float2 xi = frac(HashRandom(pixelPosition) + temporalSample);
    return SampleHemisphereCosine(xi.x, xi.y, normal);
}
Irradiance的计算,直接取采样得到的颜色。按AI的说法,没有除以PDF(概率密度函数),是因为n\cdot L与PDF一样,约掉了。
Accmulate Pass的实现
Accmulate Pass需要把当前帧与历史帧进行合并,其中还按深度对某些像素的结果进行了剔除。并且通过 _SSGIHistoryWeight来控制混合结果。如果无限地累加下去,场景会越来越暗,我已经不记得AI的说法了,但是加上这个参数(范围是0-1),就可以获得一个比较稳定的结果,但是会有一些噪点。这个参数按我的理解,是控制蒙特卡洛积分公式中的N的数量。
float4 FragAccumulate(Varyings input) : SV_Target
{
    float2 uv = input.texcoord;
    float4 current = SAMPLE_TEXTURE2D_X(_BlitTexture, sampler_LinearClamp, uv);
    if (_SSGIHistoryValid <= 0.0)
        return curren
    float4 history = SAMPLE_TEXTURE2D_X(_SSGIHistoryTexture, sampler_LinearClamp, uv);
    bool currentHasGeometry = current.a >= 0.0;
    bool historyHasGeometry = history.a >= 0.0;
    if (currentHasGeometry != historyHasGeometry || !currentHasGeometry)
        return curren
    float currentDepth = current.a;
    float historyDepth = history.a;
    float depthThreshold = max(_SSGIHistoryDepthThreshold, currentDepth * 0.01);
    if (abs(currentDepth - historyDepth) > depthThreshold)
        return curren
    float3 accumulated = history.rgb + (current.rgb - history.rgb) * _SSGIHistoryWeight;
    return float4(accumulated, current.a);
}
Composite Pass的实现
Composite Pass就比较简单,与Camera RT进行混合即可。
float4 FragComposite(Varyings input) : SV_Target
{
    float2 uv = input.texcoord;
    float4 indirect = SAMPLE_TEXTURE2D_X(_BlitTexture, sampler_LinearClamp, uv);
    float3 original = SAMPLE_TEXTURE2D_X(_OriginalTexture, sampler_LinearClamp, uv).rgb;
    return float4(original + indirect.rgb * saturate(_SSGIMaxBlend), 1.0);
}
最终结果
加上高斯模糊后,混合结果如下,可以看到场景被照亮了。
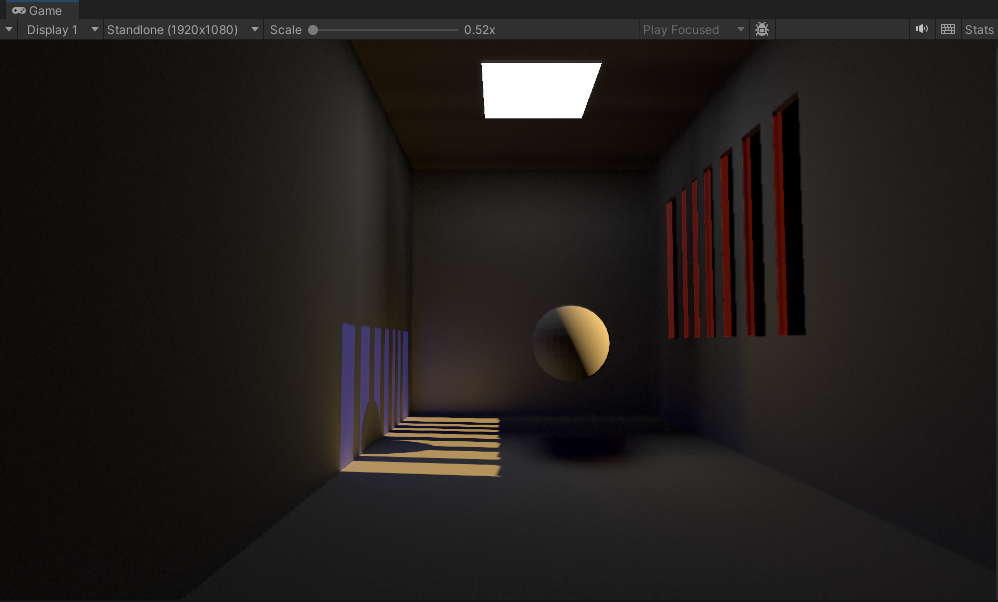
但是没有渗色,左边蓝色的墙没有在球上体现,右边红色的墙也没有反射到球上以及白色的地板上,全都是白色是因为直接顶部的白色的面片的影响最大,我们没有把它当做面光源,所以直接光照中它没有把场景照亮,而大部分像素在计算间接光照时,都受它影响,黑色部分就被计算成白色了。
解决渗色的问题
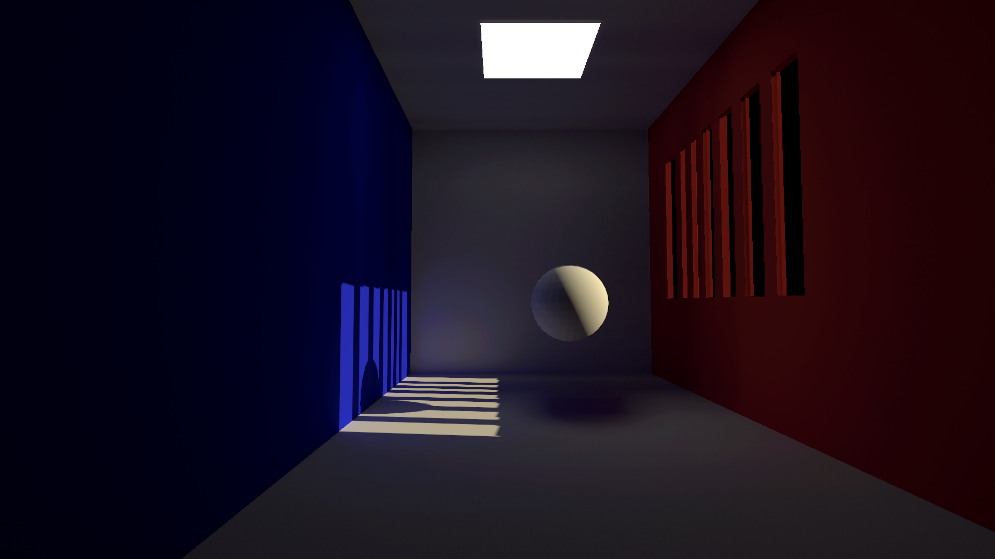
引起这个问题的本质原因是,没有把顶部面片当做面光源来处理。那么在计算直接光照时,计算面光源的结果是否可行呢?答案当然是的。但是我另辟蹊径,在计算渲染物体直接光照时,把累积的 Irradiance Texture输入进去,作为间接光照的结果,来和直接光照直接相加,作为物体的渲染结果,而 SSGI Pass和 Accmulate Pass只输出最新的 Irradiance Texture,这样就可以在渲染物体的时候,把物体表面本身的 albedo考虑进来,最终渲染结果如下:
其他问题
上述方法可以获得一张比较干净的图,也符合蒙特卡洛光线追踪的原理。但是收敛慢,且当物体或相机发生改变时,要重新计算积分。所以在AI的建议下,引入了Temporal重投影,深度阈值剔除,深度变化重计算,最大帧数限制等方法,会获得一个收敛较快的实现方案,但是参数会影响画面质量,留下一些闪烁的噪点。
深度变化判断
在渲染物体时,当相机没有发生改变时,则直接采样当前帧的 Irradiance Texture。
float2 screenUV = GetNormalizedScreenSpaceUV(input.positionCS);
bool requiresDepthValidation = _SSGIReprojectIrradiance > 0.5;
half3 indirectIrradiance = 0.0;
half indirectConfidence = 0.0;

if (!requiresDepthValidation)
{
    half4 irradianceDepth = SAMPLE_TEXTURE2D_X(_SSGIIrradianceTexture, sampler_LinearClamp, screenUV);
    if (irradianceDepth.a >= 0.0)
    {
        indirectIrradiance = irradianceDepth.rgb;
        indirectConfidence = 1.0;
    }
}
否则,计算上一帧重投影深度,与当前帧深度比较,深度在给定阈值内的像素,使用旧的 irradiance,否则使用新的。这样就可以通过深度阈值来复用历史的数据,坏处可想而知,会引入不正确的噪点。
float4 previousCS = mul(_SSGIPreviousViewProjectionMatrix,float4(input.positionWS, 1.0));
float2 previousUV = previousCS.xy / max(previousCS.w, 0.000001) * 0.5 + 0.5;
bool previousUVValid = previousCS.w > 0.0 && all(previousUV >= 0.0) && all(previousUV <= 1.0);
if (previousUVValid)
{
    half3 reprojectedIrradiance = SAMPLE_TEXTURE2D_X(
        _SSGIIrradianceTexture,
        sampler_LinearClamp,
        previousUV).rgb;
    float reprojectedDepth = SAMPLE_TEXTURE2D_X(
        _SSGIIrradianceTexture,
        sampler_PointClamp,
        previousUV).a;
    float expectedDepth = -mul(
        _SSGIPreviousWorldToCameraMatrix,
        float4(input.positionWS, 1.0)).z;
    float depthThreshold = max(
        _SSGIHistoryDepthThreshold, expectedDepth * 0.01);
    bool depthValid = reprojectedDepth >= 0.0 &&
        expectedDepth > 0.0 &&
        abs(reprojectedDepth - expectedDepth) <= depthThreshold;
    if (depthValid)
    {
        indirectIrradiance = reprojectedIrradiance;
        indirectConfidence = 1.0;
    }
}

//  使用当前帧的结果作为保底
if (indirectConfidence <= 0.0 && _SSGIDisocclusionFallback > 0.0)
{
    half4 fallbackIrradiance = SAMPLE_TEXTURE2D_X(_SSGIIrradianceTexture, sampler_LinearClamp, screenUV);
    float fallbackDepth = SAMPLE_TEXTURE2D_X(_SSGIIrradianceTexture, sampler_PointClamp, screenUV).a;
    if (fallbackDepth >= 0.0)
    {
        indirectIrradiance = fallbackIrradiance.rgb;
        indirectConfidence = _SSGIDisocclusionFallback;
    }
}
最终采样获得的 irradiance,会参与到着色的计算过程:
color += indirectIrradiance * baseColor.rgb * indirectConfidence;
SSGI Pass的变化
SSGI Pass没有什么变化。就是输出的时候,a通道保存深度,这会在物体着色时和 Accmulate Pass中用到。
return float4(outgoingRadiance * _SSGIIntensity, min(viewPos.z, 65500.0));
历史帧混合
在 Accmulate Pass中,会判断像素的上一帧位置是否仍然有效,来判断是直接使用新计算的 irradiance,亦或是将新计算的 irradiance与历史帧混合。
float2 uv = input.texcoord;
float4 current = SAMPLE_TEXTURE2D_X(_BlitTexture, sampler_LinearClamp, uv);

if (current.a < 0.0)
    return current;

float rawDepth = SampleSceneDepth(uv);
if (!IsSSGIRawDepthValid(rawDepth))
    return current;

SSGITemporalHistory temporal = GetSSGITemporalHistory(uv, rawDepth);
if (!temporal.valid)
    return current;

float currentFrameWeight = GetSSGICurrentFrameWeight();
float3 accumulated = lerp(temporal.irradianceDepth.rgb, current.rgb, currentFrameWeight);
return float4(accumulated, current.a);
流程中,深度的有效性验证只是确保深度在0-1范围内,而历史数据的有效性判读在 GetSSGITemporalHistory函数中,它依赖URP提供的 Motion Vector,来计算历史UV,并采样历史混合的 irradiance以及历史深度。最后就将历史帧按当前帧权值,插值到当前帧的结果,并返回保存到 irradiance texture中,在下一帧渲染物体时使用。
SSGITemporalHistory GetSSGITemporalHistory(float2 uv, float rawDepth)
{
    SSGITemporalHistory result;
    result.valid = false;
    result.previousUV = uv;
    result.irradianceDepth = 0.0;

    if (_SSGIHistoryValid <= 0.0 || !IsSSGIRawDepthValid(rawDepth))
        return result;

    float2 motion = SAMPLE_TEXTURE2D_X(_MotionVectorTexture, sampler_LinearClamp, uv).xy;
    float2 previousUV = uv - motion;
    result.previousUV = previousUV;
    if (!IsSSGIUVValid(previousUV))
        return result;

    float4 history = SAMPLE_TEXTURE2D_X(_SSGIHistoryTexture, sampler_LinearClamp, previousUV);
    float historyDepth = SAMPLE_TEXTURE2D_X(_SSGIHistoryTexture, sampler_PointClamp, previousUV).a;
    if (historyDepth < 0.0)
        return result;

    float3 currentPositionWS = ComputeWorldSpacePosition(uv, rawDepth, UNITY_MATRIX_I_VP);
    float previousExpectedDepth = -mul(_SSGIPreviousWorldToCameraMatrix, float4(currentPositionWS, 1.0)).z;
    float depthThreshold = max(_SSGIHistoryDepthThreshold, max(previousExpectedDepth, 0.0) * 0.01);
    if (previousExpectedDepth <= 0.0 || abs(historyDepth - previousExpectedDepth) > depthThreshold)
        return result;

    result.valid = true;
    history.a = historyDepth;
    result.irradianceDepth = history;
    return result;
}
当前帧的权值简单实现为按帧数平均的权值。_SSGIHistoryFrameCount是当前累积帧数,_SSGIMaxHistoryFrames是最大帧数,_SSGIHistoryWeight是设定的历史帧权值,该值设置得越小,历史帧越重要,则引入新噪点的机会越小,越接近蒙特卡洛积分结果。
float GetSSGICurrentFrameWeight()
{
    float runningAverageWeight = rcp(_SSGIHistoryFrameCount + 1.0);
    return _SSGIHistoryFrameCount < _SSGIMaxHistoryFrames
        ? runningAverageWeight
        : _SSGIHistoryWeight;
}
参考资料
[1] Unity实现SSGI